The Ultimate Guide to Making Perfect Coconut Cream Pie Bars
Are you ready to embark on a delicious journey that tantalizes your taste buds and evokes memories of summer? Coconut Cream Pie Bars are the perfect treat for anyone who loves the sweet, tropical flavor of coconut paired with a creamy filling and a crispy crust. In this guide, we will take you through the steps to create these delightful bars, ensuring you not only make them perfectly but also understand the artistry behind every layer. We'll also explore the history and the variations of coconut cream desserts, along with tips for storing and serving.
Buckle up as we dive into this culinary adventure! You'll be an expert in making Coconut Cream Pie Bars by the end of this article—let’s roll up those sleeves.
Table of Contents
- What Are Coconut Cream Pie Bars?
- Ingredients Breakdown
- 2.1 The Crispy Crust
- 2.2 The Creamy Filling
- 2.3 The Fluffy Topping
- Step-by-Step Instructions
- Pro Tips for the Best Coconut Cream Pie Bars
- Variations of Coconut Desserts
- Serving Suggestions
- Frequently Asked Questions (FAQs)
- Nutrition Information
- How to Store Your Coconut Cream Pie Bars
- Conclusion
What Are Coconut Cream Pie Bars?
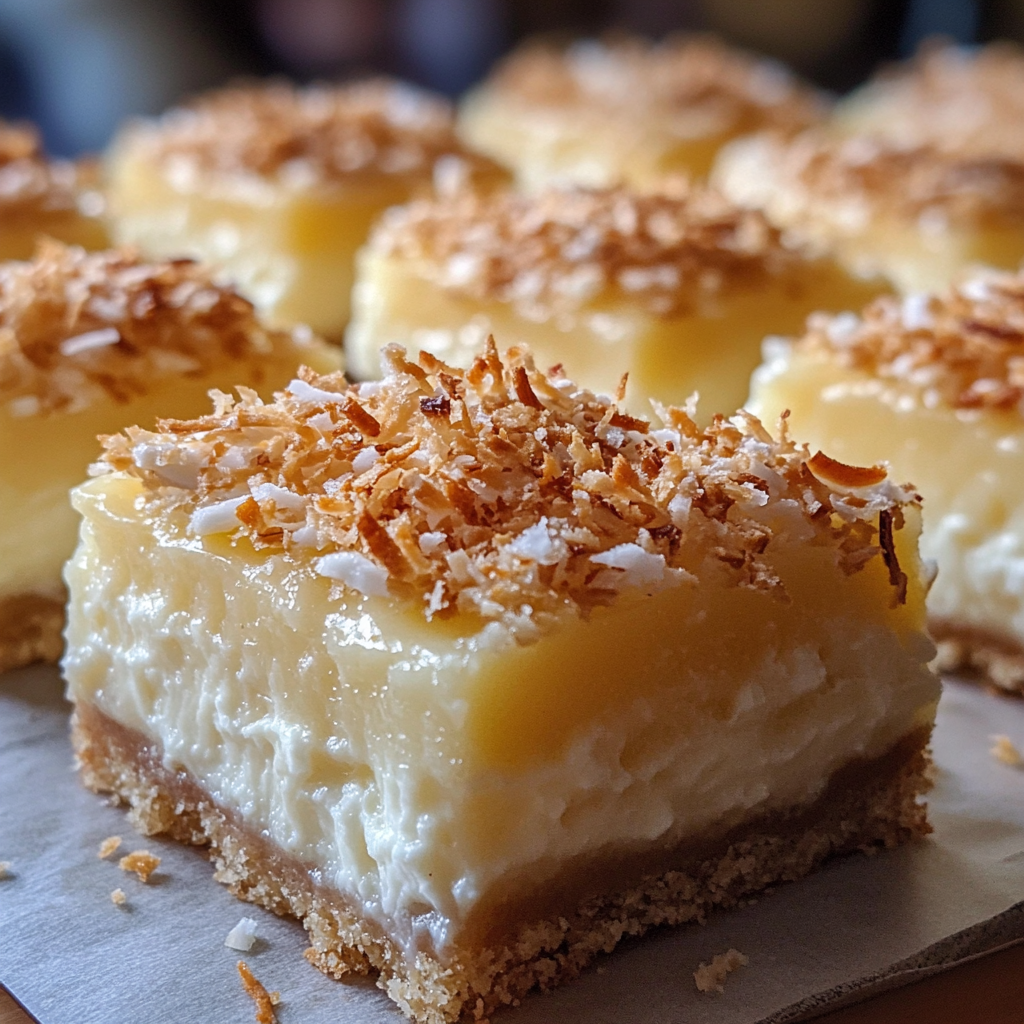
Coconut Cream Pie Bars are a delightful twist on the traditional coconut cream pie. These bars combine the richness of the coconut filling with a buttery graham cracker crust, topped with an airy whipped cream layer, and are often finished with toasted coconut flakes. They are perfect for picnics, potlucks, and any dessert table, captivating coconut lovers and dessert enthusiasts alike.
The best part? These bars are a breeze to make and offer portion control compared to a traditional pie, making them an excellent choice for gatherings where you want to make sure everyone gets a slice.
Ingredients Breakdown
Before we begin, let’s take a closer look at the ingredients you'll need to create these Coconut Cream Pie Bars.
The Crispy Crust
The foundation of any great dessert is a strong crust. Here's what you'll need for the crust:
- 1 ½ cups graham cracker crumbs: These provide a sweet and crunchy texture.
- ½ cup unsweetened shredded coconut: This gives the crust an additional coconut flavor, enhancing the overall taste.
- ½ cup unsalted butter, melted: This binds the dry ingredients together for that perfect texture.
- ½ cup granulated sugar: To add sweetness to the crust layer.
The Creamy Filling
Now, let’s talk about the star of the show—the filling!
- 1 cup sweetened condensed milk: This adds rich sweetness and creaminess.
- 1 cup coconut milk: Using coconut milk infuses the filling with a rich coconut flavor.
- 3 large egg yolks: These provide structure and richness to the filling.
- ½ cup shredded coconut (toasted): Toasting coconut brings out its natural flavors and adds a delicious crunch.
- 2 tablespoons cornstarch: This thickens the filling as it cooks.
- 1 teaspoon vanilla extract: Enhances the overall flavor profile.
The Fluffy Topping
Lastly, we need a light topping to balance the richness of the filling:
- 1 cup heavy whipping cream: This is whipped to create a light and airy topping.
- 2 tablespoons powdered sugar: Adds just enough sweetness to the whipped cream.
- ½ teaspoon vanilla extract: For extra flavor in the topping.
- Toasted coconut flakes, for garnish: This is the cherry on top, providing an attractive finish and texture contrast.
Step-by-Step Instructions
Creating these Coconut Cream Pie Bars is straightforward, but each step is essential for achieving the perfect result. Here’s a detailed, step-by-step guide:
Step 1: Preheat and Prepare
Preheat your oven to 350°F (175°C). After that, grease an 8×8-inch baking dish, ensuring easy removal once your bars are set.
Step 2: Make the Crust
In a mixing bowl, combine graham cracker crumbs, shredded coconut, melted butter, and granulated sugar. Mix until fully combined. Then, press this mixture evenly into the bottom of the prepared baking dish. Bake this for 10 minutes and let it cool completely.
Step 3: Prepare the Filling
In a medium saucepan over medium heat, whisk together sweetened condensed milk, coconut milk, and egg yolks until smooth. Stir in the toasted coconut, cornstarch, and vanilla extract. Continue stirring over medium heat until the mixture begins to thicken, about 5-7 minutes.
Step 4: Assemble the Bars
Once thickened, pour the filling over the cooled crust. Smooth it out with a spatula and refrigerate for at least 4 hours or until the filling is completely set.
Step 5: Prepare the Topping
Once the filling has set, whip the heavy cream with powdered sugar and vanilla extract in a mixing bowl until stiff peaks form. Spread or pipe this whipped cream over the coconut filling.
Step 6: Garnish and Serve
Sprinkle toasted coconut flakes generously on top as a garnish. Slice into bars and serve chilled for the best taste!
Pro Tips for the Best Coconut Cream Pie Bars
- Use Fresh Ingredients: For the freshest flavor, opt for high-quality ingredients—especially the coconut.
- Toast Your Coconut: Toasting adds a nutty flavor and crunch. Spread shredded coconut on a baking sheet and bake at 350°F (175°C) until golden, about 5-10 minutes. Watch closely!
- Control the Sweetness: Adjust the sugar in the crust and topping based on your taste preferences.
- Chill Properly: Make sure to allow adequate time for chilling. This prevents the filling from being runny and ensures those bars hold their shape.
- Experiment with Spices: Try adding a hint of cinnamon or nutmeg to the crust for an interesting flavor twist!
Variations of Coconut Desserts
Coconut is a versatile ingredient, and there are numerous ways to incorporate it into desserts:
- Coconut Cream Pie: The classic version is beloved for its flaky pie crust and a decadent, creamy filling.
- Coconut Macaroons: These chewy cookies have a wonderful coconut flavor and are often dipped in chocolate.
- Coconut Pudding: Silky and smooth, this pudding is a quick alternative that still captures coconut's delightful essence.
Serving Suggestions
Presenting your Coconut Cream Pie Bars can be just as fun as making them! Here are some serving suggestions:
- Add Fresh Fruits: Pair with slices of fresh mango or pineapple for a tropical vibe.
- Chocolate Drizzle: Drizzle melted dark chocolate over the bars for an added layer of decadence.
- Mint Leaves: Garnish with fresh mint leaves to enhance visual appeal and add a refreshing note.
Frequently Asked Questions (FAQs)
What type of coconut should I use?
For the crust, use unsweetened shredded coconut and for garnish, opt for toasted flakes. This gives that wonderful crunch and enhances flavor.
Can I make these bars gluten-free?
Yes! Substitute gluten-free graham crackers for the crust, and ensure all other ingredients are gluten-free as needed.
How long will these bars keep?
These bars can stay fresh for about a week when stored in an airtight container in the refrigerator.
Nutrition Information
Per serving (an estimated two-inch square bar):
- Calories: 300
- Total Fat: 20g
- Saturated Fat: 12g
- Cholesterol: 60mg
- Sodium: 125mg
- Total Carbohydrates: 30g
- Dietary Fiber: 2g
- Sugars: 15g
- Protein: 3g
Please note that nutritional values can vary based on ingredient brands and specific measurements.
How to Store Your Coconut Cream Pie Bars
To maintain the freshness of your Coconut Cream Pie Bars:
- Refrigerate: Keep them in an airtight container in the refrigerator.
- Freeze: If you need to store them for a longer period, wrap individual bars tightly in plastic wrap and then place them in a freezer-safe container. They will last for about three months in the freezer. Just thaw them in the refrigerator before serving.
Conclusion
In conclusion, crafting Coconut Cream Pie Bars isn’t just about following a recipe; it’s about creating an experience filled with tropical flavor and creamy goodness. From selecting the best ingredients to mastering the art of assembling layers, each step influences the final outcome. With the help of this detailed guide, you are well on your way to impressing family and friends with a dessert that’s not only visually